- Decorating and colour tips
- Applying your sticker - some tips
- How to apply
Decorating and colour advice
Walls are the largest surface area in a room. Like a giant canvas, they give you
the creative freedom to bring it to life a Wall Cravings have designs that can make
your walls or space calm, letting them blend into the background, or designs that
can decorate them with patterns, colours and objects designed to make them stand
out with a bold attitude
The great thing about Wall Cravings is that it lets you instantly add design to
any space. This can be used as the basis of a decorative scheme, where furnishings
are bought in matching colours, to create a uniform feeling throughout. Watch out
for our textiles line to be launched very soon - matching pillows and throws for
some of our designs.
Most of our designs have colour options that can be used on any colour background.
For our designs we have chosen colours that we feel will best suit most colour backgrounds
and surfaces, especially if you require minimum change in your house, apartment
or office, and prefer sticking to white or cream walls. Check out our Floral & Nature
collection. For those who require maximum change for their big bold backgrounds,
choose one of our larger designs, take a peek at our Graphic stickers. For rooms
painted in bright colours and furnished with brightly coloured bedspreads/sofas
etc then try our Mirror stickers. These give a great reflective effect with colours
in any room. Try these on your furniture and nurseries also. Kids & babies love
looking at themselves in them!
Some basic rules on choosing background colours:
Warm colours - Most designers and artists refer to colours as warm
or cool. Warm colours include yellows, reds, oranges, browns and some purples. This
family of colours can remind you of the sun or fire. These colours usually make
a room appear smaller and more intimate, so they are great choices for larger rooms.
Produces an active and stimulating mood effect.
Cool colours - cool colours include blues, greens and some pinks
and purples. These colours are calming and will give relaxing vibes. They can make
a small room appear larger. When blended with warm colours, they create a nice balance
of visual and tonal property that produces unique settings.
Complimentary colours - colours that are opposite to each other
on a colour wheel chart, such as blue and yellow, red and green or turquoise and
orange. They create a strong contrast and therefore a lively, vibrant colour scheme.
Neutral colours - These are the most popular background colours
because they give a very natural and peaceful interior. The colours of white, ivory,
beige, cream, stone, brown are neutral colours that are common in contemporary finishes.
A neutral background works well contrasting stronger colours, tones, textures and
patterns to compliment.
Non chromatic colours - - black and white and sometimes grey, are
used together to create a big contrast to any setting. The most common contrast
is between black and white, a combination which has a very dramatic, explicit finish.
Walls are the background of our lives and they also make up the larger part of our
interior worlds. And, best of all, it is very simple to take down Wall Cravings
as soon as you wish to re-decorate!
Applying your Wall Cravings sticker - some tips
To begin with make sure you have the following: measuring tape, ladder (in case
of applying to high wall), masking tape or similar light tape, pair of scissors,
the white plastic scraper provided inside our packaging (or similar object like
a ruler or credit card) and a live, clean flat surface ready for your Wall Cravings
sticker.
Make sure you know the measurement of your design against the wall or surface measurement
to ensure that the sticker is placed in the exact position that you want and to
the size you desire. Use a measuring tape if needed.
It’s always more fun if two of you apply the sticker, also so much easier! Some
of our more detailed or large designs can take over 60 minutes to install, but it
will be a fun time and a fantastic result.
Do not use on freshly painted walls or surfaces. We recommend that if possible apply
to gloss and satin finish painted walls. Ensure application only after 3-4 weeks
of being painted.
Do not store your Wall Cravings stickers in direct sunlight, very hot or damp areas.
Apply within 2 months of purchase.
How to apply:
1. Check your surface
Be sure that the surface you are applying the Wall Cravings sticker to is: clean,
dry, smooth and free of dust and dirt. Wall Cravings stickers can be applied to
walls, wood, glass, and window’s, mirrors, bathroom tiles, concrete, metal or any
smooth and dry surface. Wall Cravings are easily removed but cannot be repositioned
or reused.
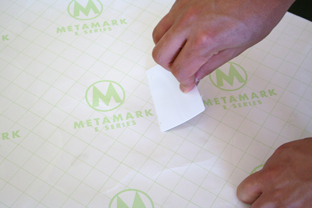
2. Prepare the Wall Cravings vinyl sticker
You have 3 parts of a Wall Cravings sticker. 1. The white backing sheet. 2. The
vinyl sticker. 3. The transparent transfer tape. Lay each Wall Cravings sticker
on a flat surface, graphic side down. Press and rub very firmly over the entire
sticker with the white plastic scraper (or ruler, credit card or similar object).
This is done to ensure that the sticker adheres properly to the transfer sheet and
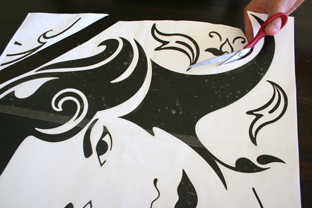
peels off more easily. If your design requires that you cut several pieces out from
the sheet before application, this is the time to do it. Taking a pair of scissors,
cut carefully around the vinyl leaving a little gap around the edge, avoiding cutting
on the vinyl sticker itself. Remember to rub very firmly over the back of the cut-out
sticker piece
3. Plan your design layout to size of wall and your own taste
Arrange your Wall Cravings sticker design on the desired wall or surface using masking
tape or a light tape (on the top edge only). Some of our more detailed designs will
have instructions and keys that come with them. It’s important to follow these.
Do not remove the white backing until you are satisfied with your design layout.
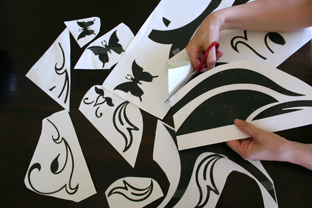
Some of our designs have many pieces that allow you to create your own complete
design and place them where you wish; You can cut individual pieces out with a pair
of scissors and apply as many or as little as you wish. Some others you have to
join and match them to create the final layout. It’s easier to match and join the
larger pieces together first, adding the smaller pieces afterwards.
4. Application of the Wall Cravings Sticker
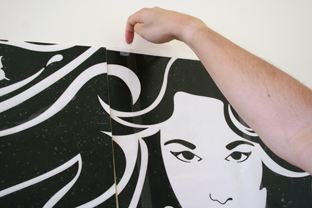
From any corner, very carefully, slowly peel the white backing away from the transfer
tape, following over with the scraper to help push down and to avoid any tearing.
It’s better if you start at the top centre and work your way out to the edges and
bottom of the sticker. The vinyl sticker should be sticking to the transparent transfer
tape and the wall. If some of the sticker remains stuck to the white backing, stop
immediately, go back and re-rub the sticker in that area, then slowly continue peeling
until the white backing is completely removed and the sticker has adhered to the
transfer sheet.
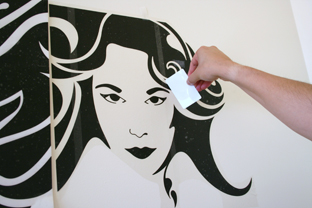
5. Transferring the sticker to the wall/surface
With your hand and the white plastic scrapper (ruler or credit card) finish the
application by rubbing over the entire vinyl sticker to remove any bumps caused
by air bubbles, and also to ensure that the sticker is completely affixed.
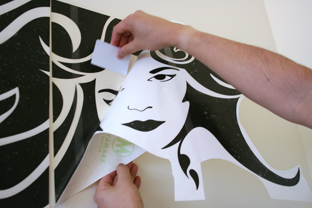
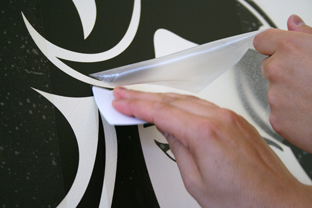
6. Remove transfer sheet
Once you have removed the air bubbles, wait about 10 minutes, then starting from
any corner; slowly peel away the transfer sheet. Remove by pulling slowly and carefully
downwards away from the vinyl. Make sure none of the vinyl pulls up with the transfer
film, so that the sticker is sticking to your surface and not to the transfer sheet;
if required, roll back the transfer tape and rub again using the white scraper to
ensure the sticker has bonded with the wall and continue to peel off. Take extra
care when peeling back transfer sheet from a painted wall.
7. Repeat process of with any of the remaining additional pieces of sticker
that make-up the final design.

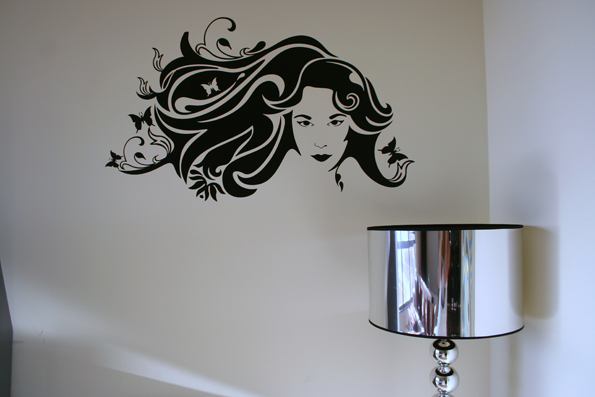
8. Your Wall Cravings sticker application is complete – sit back and enjoy your
Design that sticks!
Warning: Wall Cravings is not and will not be held responsible for any damage caused
by applying or removing stickers. Careful removal of stickers is advised, so to
avoid future touch up of paintwork areas